📦 NVIDIA Driver Installation on Proxmox (Host + LXC)
1️⃣ Prepare the Proxmox Host#
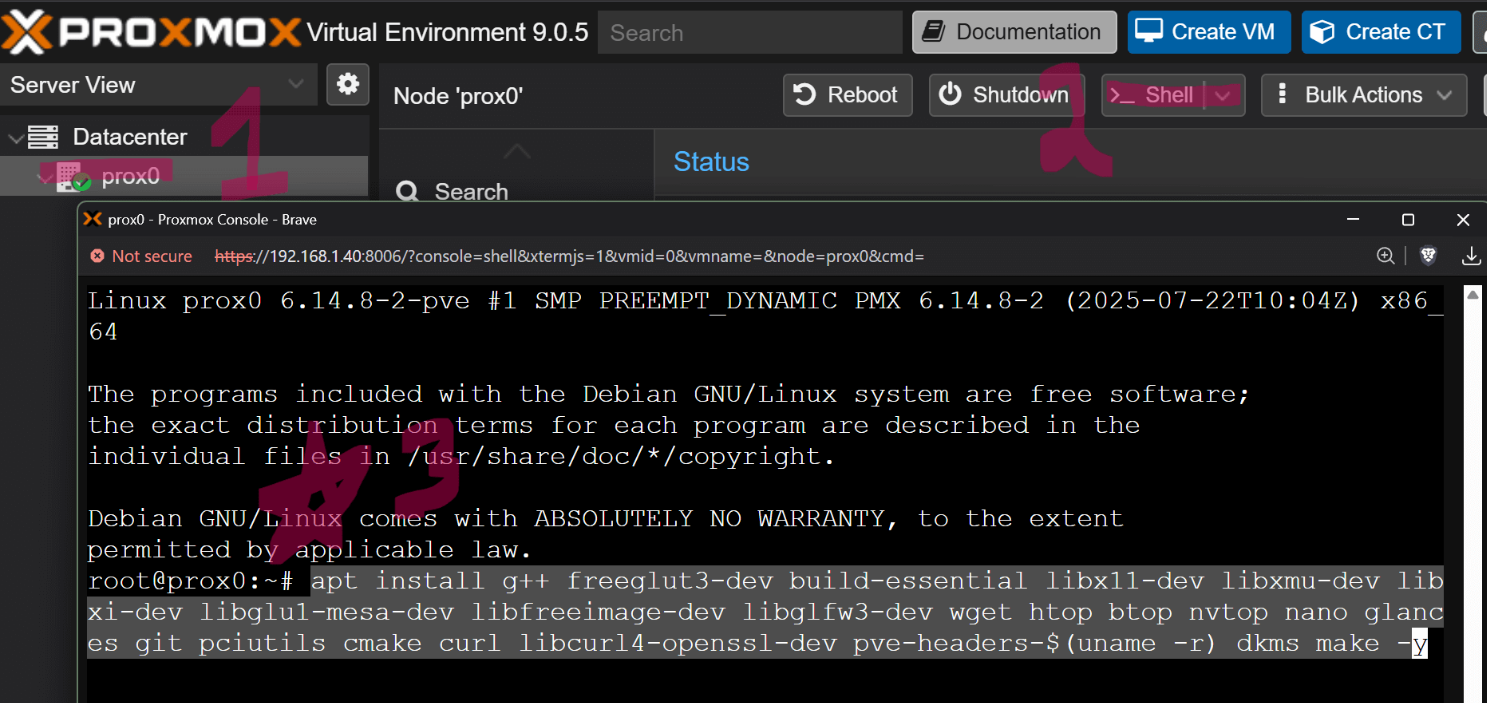
1.1 Update the system & install prerequisites#
apt install g++ freeglut3-dev build-essential libx11-dev libxmu-dev \ libxi-dev libglu1-mesa-dev libfreeimage-dev libglfw3-dev \ wget htop btop nvtop nano glances git pciutils cmake curl \ libcurl4-openssl-dev pve-headers-$(uname -r) dkms make -y \ && update-initramfs -u && reboot now
Why?
Installs compilers, libraries, DKMS support, and updates the initramfs so the new kernel can load the driver.
1.2 Reboot (if not already)#
reboot now
2️⃣ Download the NVIDIA Linux Driver#
-
Open a browser on any machine and go to the NVIDIA Unix Drivers Archive:
https://www.nvidia.com/en-us/drivers/unix/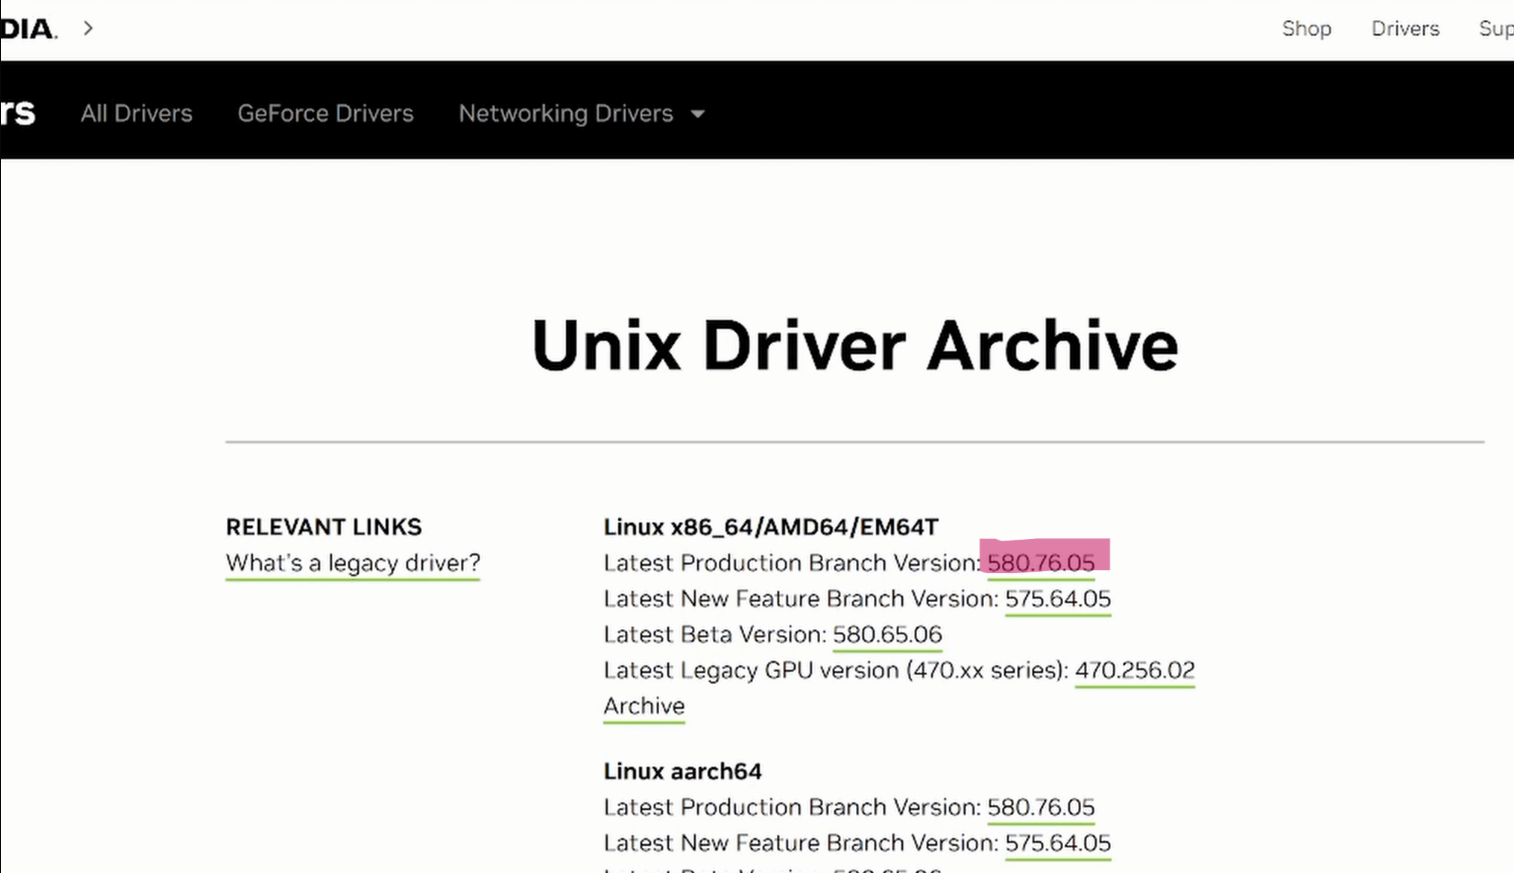
-
Locate the Latest Production Branch Version (e.g.,
560.xxor newer) and hover over the Download button. Right‑click → Copy Link Address.
-
Back on the Proxmox host, download the driver with
wget:
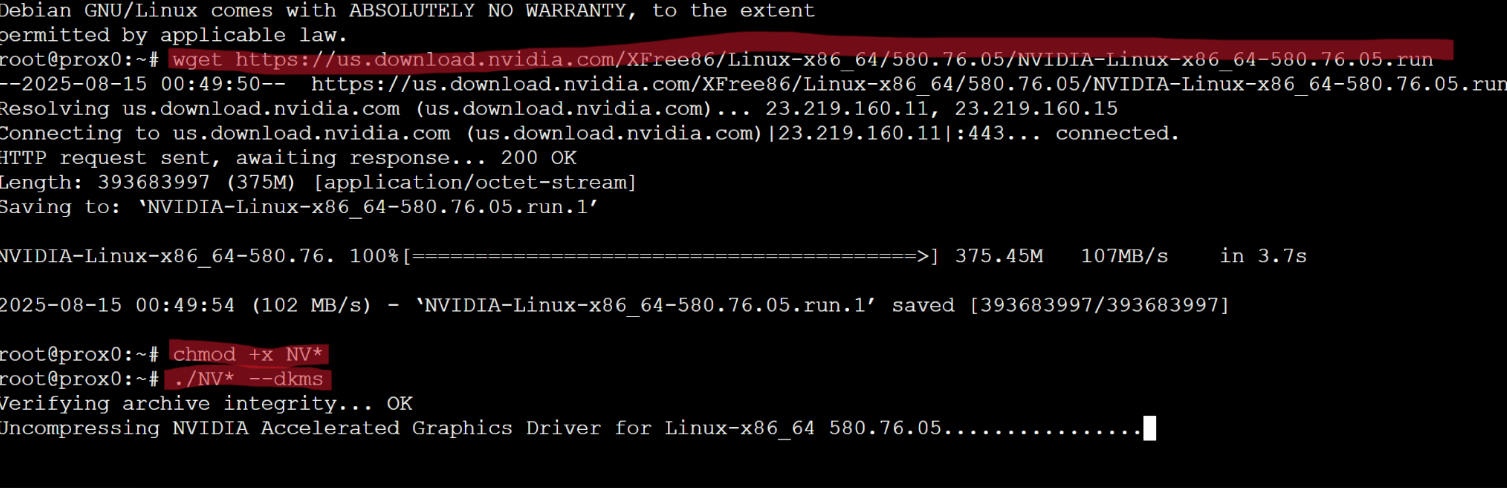
wget <PASTE_THE_LINK_HERE>
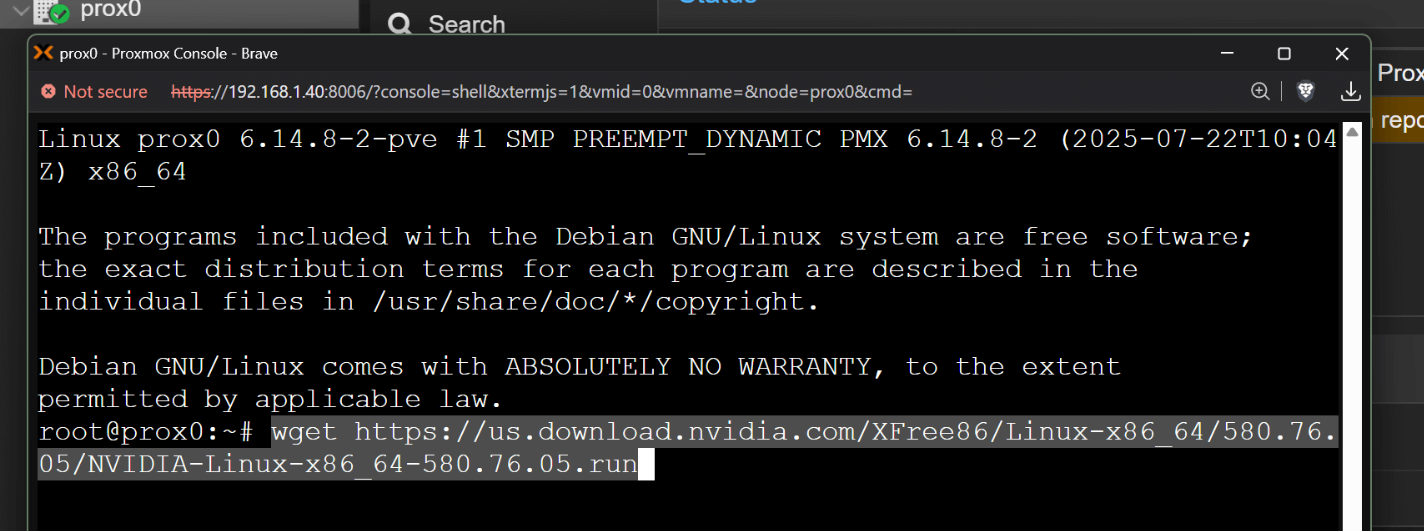
- Verify the file name (it should start with
NVIDIA-...run) and make it executable:
chmod +x NVIDIA-*.run
3️⃣ Install the Driver on the Host#
./NVIDIA-*.run --dkms
-
During the installer UI:
- Choose NVIDIA Proprietary Driver (unless you have a Blackwell 50×0 series GPU – then pick the MIT driver option).
- Ignore the X‑server prompts (you’re on a headless server).
- Accept any prompts to install missing kernel headers or to rebuild DKMS modules.
-
If the installer asks to reboot, let it do so.
3.1 Re‑run the installer (post‑reboot)#
./NVIDIA-*.run --dkms
This ensures the DKMS module is fully built and loaded.
3.2 Verify the driver#
`nvtop
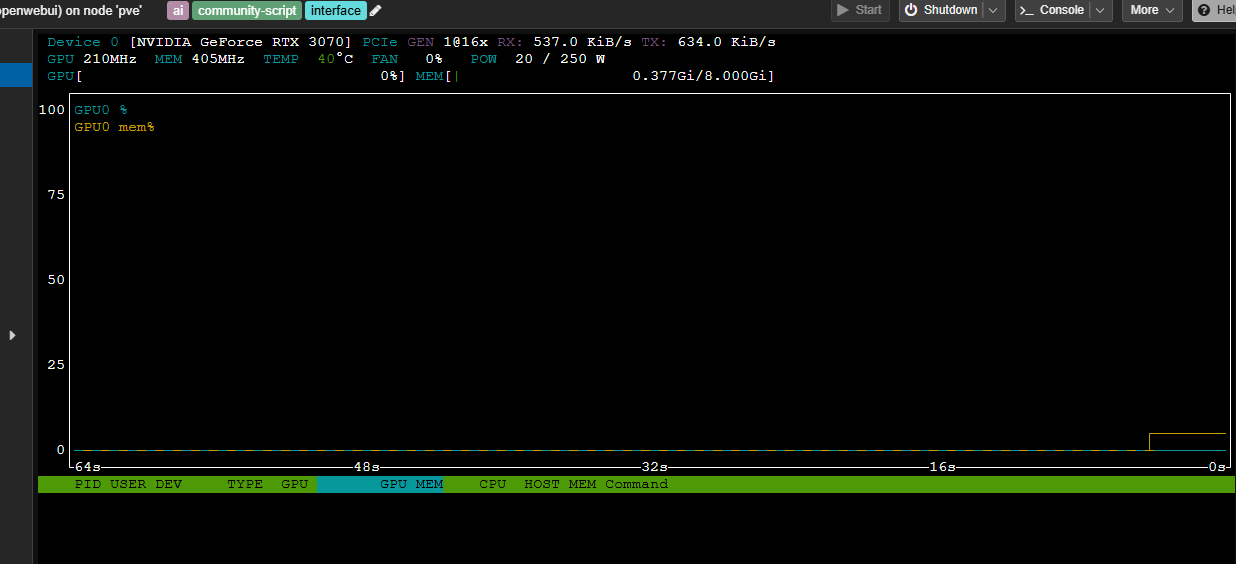
You should see your GPU(s) listed.
4️⃣ Make GPU Power Settings Persistent (Optional but recommended)#
Add a cron job that runs at every boot:
crontab -e # choose nano if prompted
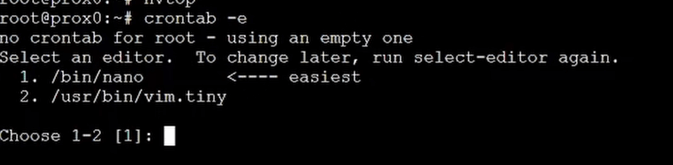
Insert at the top:
@reboot nvidia-smi -pm 1 && nvidia-smi -pl 250
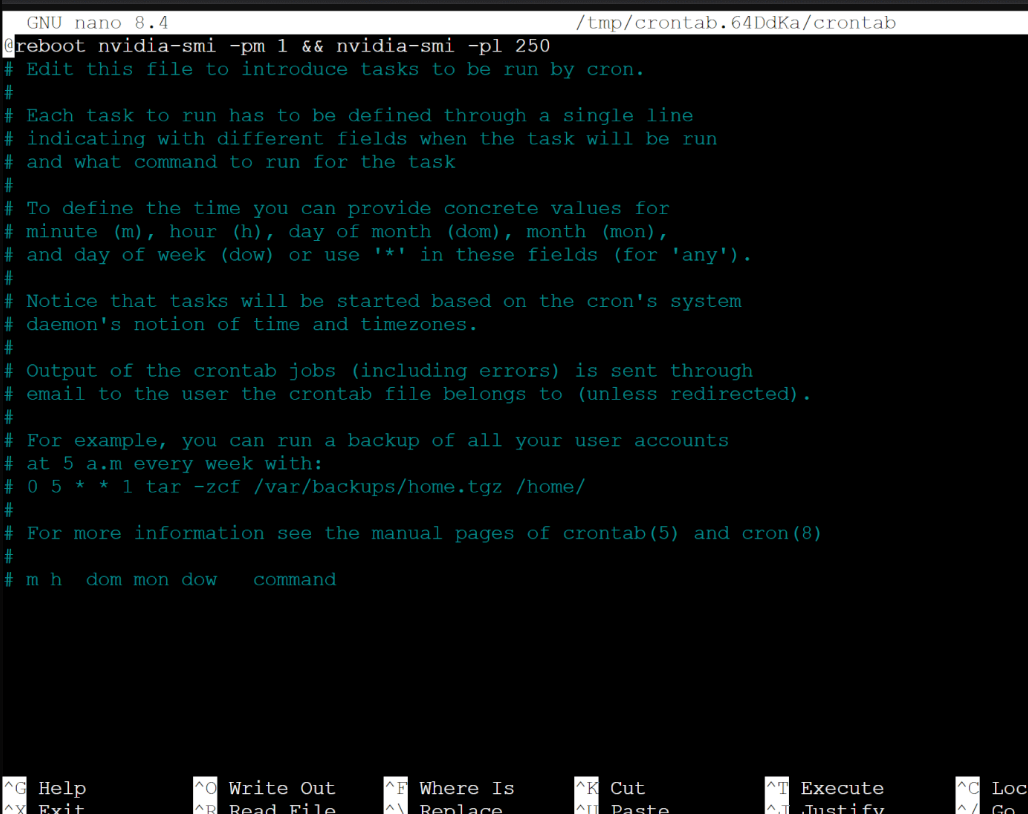
-pm 1enables persistence mode.-pl 250caps power limit to 250 W (adjust as needed for your card).
Save (Ctrl‑X, then Y).
5️⃣ Install the NVIDIA Driver Inside an LXC Container#
5.1 Update the container OS#
Go to ur LXC and enter:
apt update && apt upgrade -y && apt install nvtop -y
5.2 Transfer the driver installer to the container#
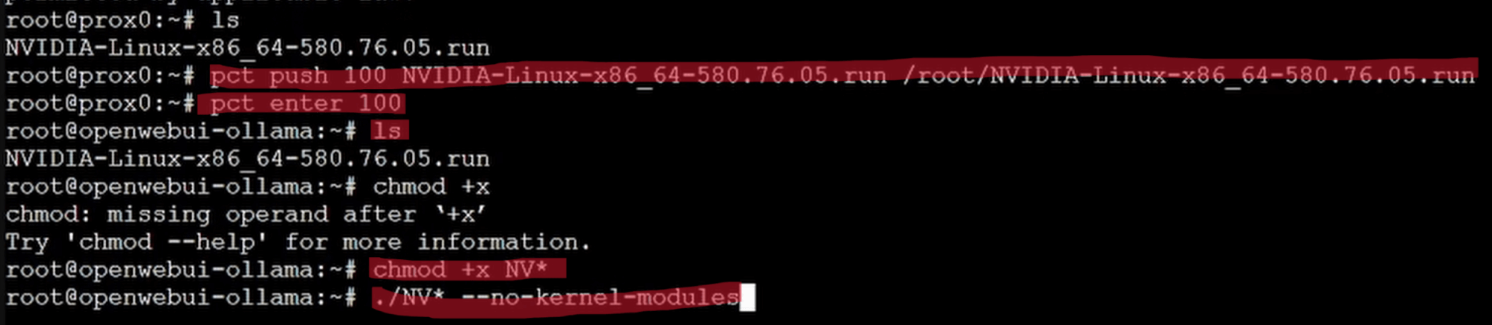
Go back into your PVE -> SHELL Assuming your container ID is 100 (replace if different):
pct push 100 NVIDIA-*.run /root/NVIDIA-*.run
5.3 Enter the container#
pct enter 100
5.4 Make the installer executable#
chmod +x /root/NVIDIA-*.run
5.5 Install the driver without building kernel modules#
./NVIDIA-*.run --no-kernel-modules
- Choose NVIDIA Proprietary Driver with default options.
- Since the host already provides the kernel module via DKMS, the container only needs the user‑space libraries.
5.6 Verify inside the container#
nvtop
You should now see the GPU(s) from within the container.
6️⃣ Passthrough the GPU(s) to the LXC Container#
6.1 List the host’s NVIDIA device nodes#
Shutdown ur LXC and go to ur PVE -> SHELL and enter:
ls -la /dev/nvidia*

Typical output:
crw-rw---- 1 root video 195, 0 Sep 10 12:34 /dev/nvidia0 crw-rw---- 1 root video 195, 255 Sep 10 12:34 /dev/nvidiactl ...
6.2 Attach devices via the Proxmox GUI#
-
Open the Proxmox web UI → PVE → CT 100 (or your container).
-
Go to Resources → Add → Device Passthrough.

-
For each
/dev/nvidiaX(e.g.,nvidia0,nvidia1, …) add a separate entry.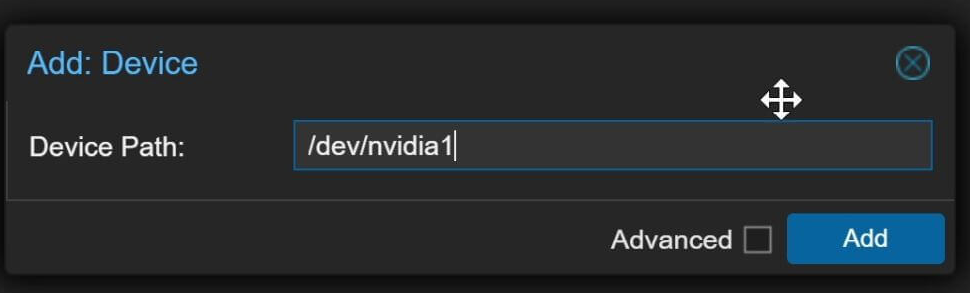
- Host Device:
/dev/nvidia0(repeat for each). - Guest Device: keep the same path.
- Host Device:
-
Apply the changes.
Tip: After adding devices, stop the container and start it again (a simple restart isn’t enough).
6.3 Confirm inside the container#
nvtop # should now list the passed‑through GPU(s)
7️⃣ Final Test & Snapshot#
- Reboot the host to ensure everything loads cleanly:
reboot
Copy
-
After the host boots, start the container and run
nvtopagain. -
If everything looks good, create a Proxmox snapshot for safety:
- In the GUI: CT 100 → Snapshots → Take Snapshot.
- Give it a descriptive name (e.g.,
gpu‑driver‑ready).
✅ Quick Recap#
| Stage | Key Command(s) | What It Does |
|---|---|---|
| Host prep | apt install … && update-initramfs -u && reboot |
Installs build tools, DKMS, updates initramfs |
| Download driver | wget <link> → chmod +x NVIDIA-*.run |
Retrieves the latest NVIDIA .run file |
| Host install | ./NVIDIA-*.run --dkms (twice) |
Installs driver with DKMS, ensures module loads |
| Persistence | crontab -e → @reboot nvidia-smi -pm 1 && nvidia-smi -pl 250 |
Keeps GPU powered on after reboots |
| Container prep | apt update && apt upgrade && apt install nvtop |
Updates container OS |
| Push driver | pct push … → pct enter … → chmod +x … |
Moves installer into container |
| Container install | ./NVIDIA-*.run --no-kernel-modules |
Installs user‑space libs only |
| Passthrough | GUI → Add → Device Passthrough for each /dev/nvidiaX |
Gives container direct access to GPUs |
| Validate | nvtop / nvidia-smi inside host & container |
Confirms driver works |
🎉 You’re all set!#
With these steps you’ll have a fully functional NVIDIA driver stack on both your Proxmox host and the LXC container, ready for GPU‑accelerated workloads (AI inference, rendering, etc.). Feel free to reach out if anything feels fuzzy or you hit a snag.